If you’ve ever opened Home Assistant for the first time and stared at the default dashboard, you know the feeling. A wall of entity cards, every sensor and switch crammed onto one page, no rhyme or reason. It works — technically — but it doesn’t feel like a smart home. It feels like a spreadsheet.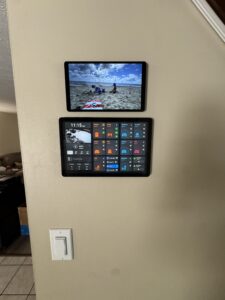
I’ve been running Home Assistant for a few years now, and my dashboard setup has gone through more redesigns than I can count. What started as a glorified light switch panel has evolved into a multi-device, purpose-built ecosystem: a sleek wall panel at the entrance, room-mounted tablets, a dedicated gauges dashboard at my desk, and a phone view that actually knows where I am and responds accordingly. Here’s how I got there.
The room-by-room problem
My first big insight was that a good dashboard mirrors how you actually think about your house. You don’t think “turn on light.bedroom_main” — you think “I’m going to bed.” So I rebuilt everything around rooms.
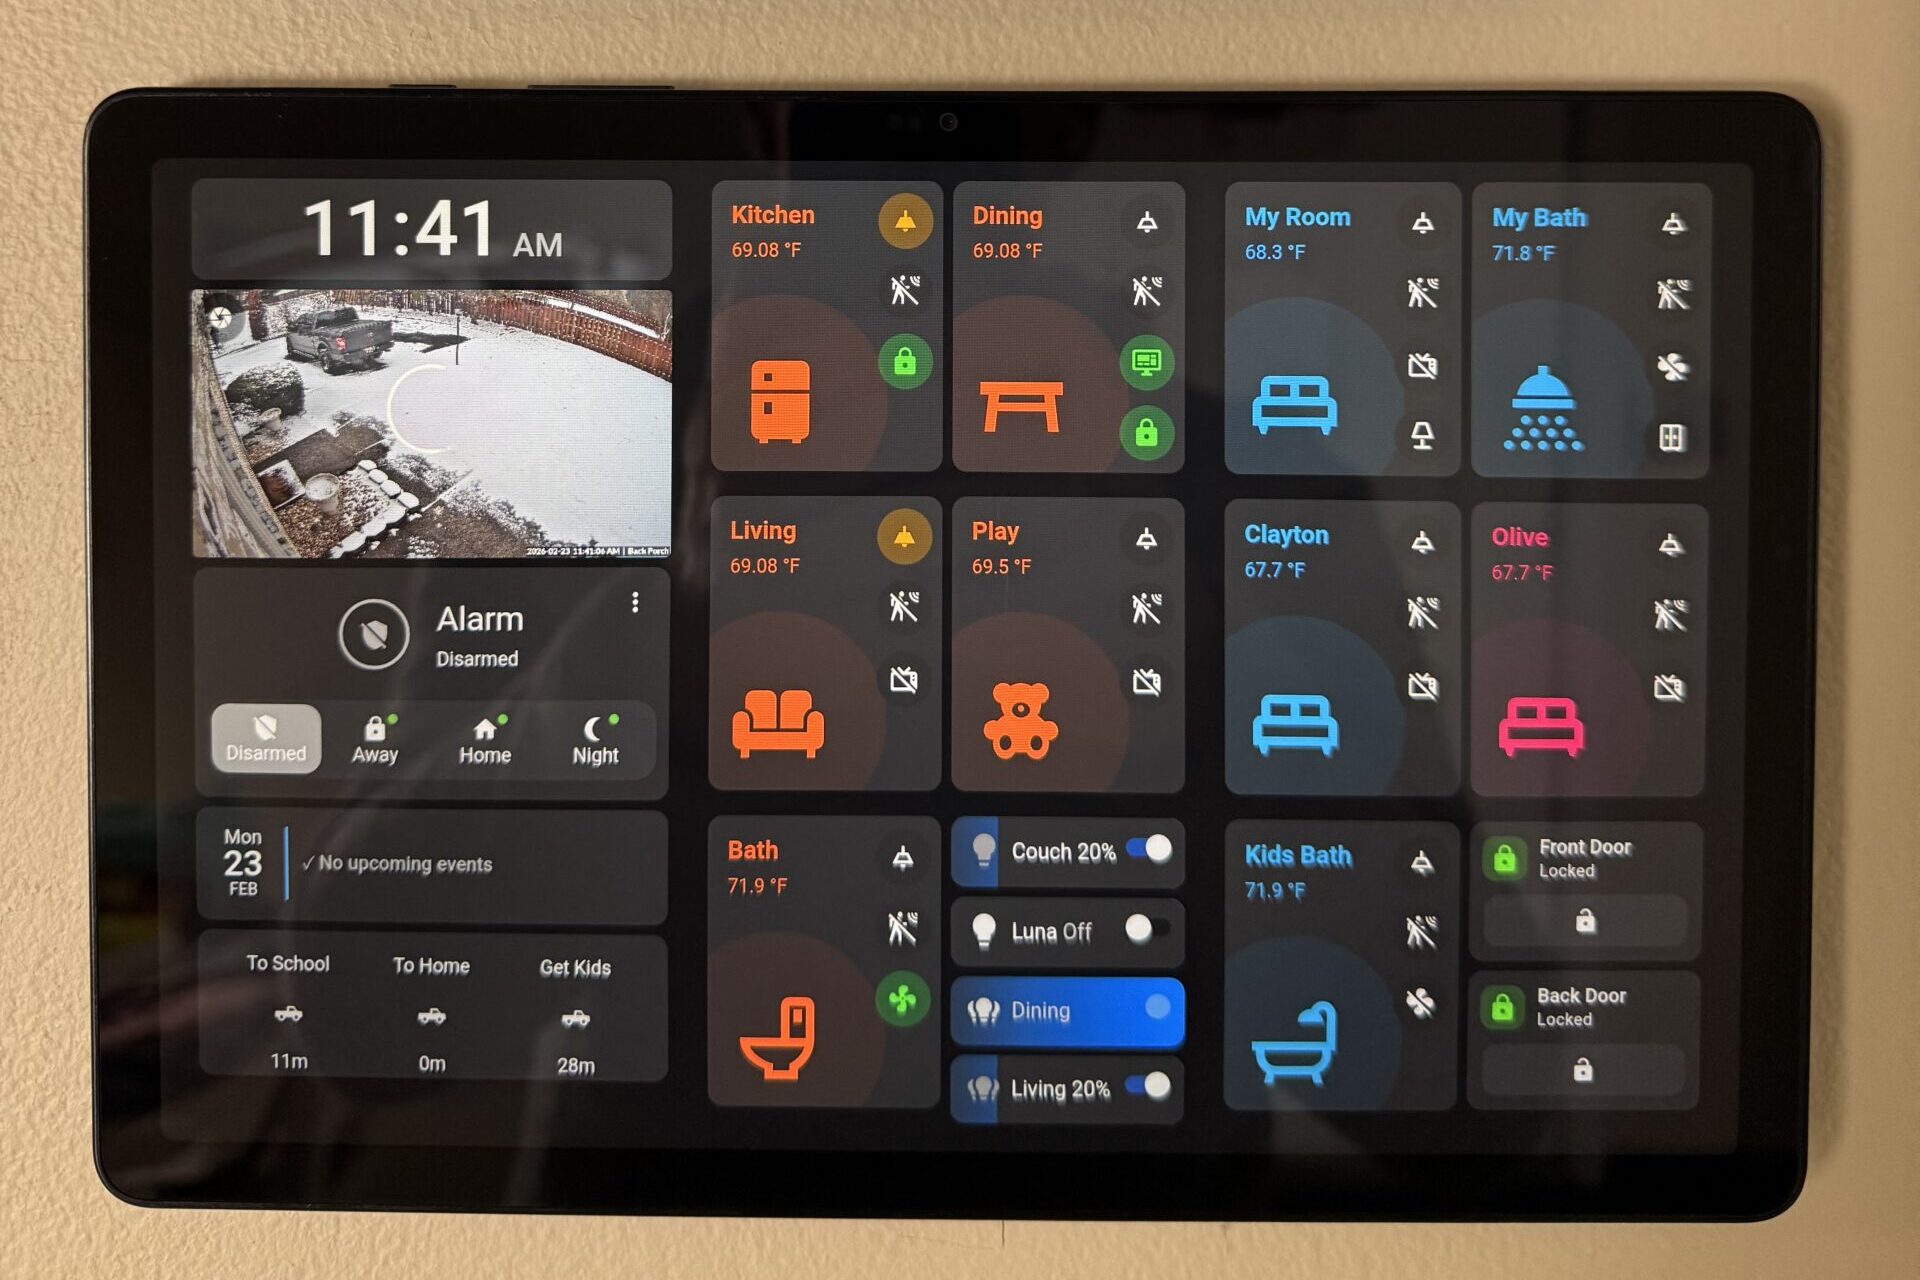
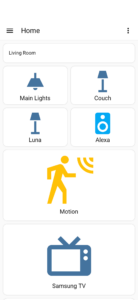
Each room got its own view: living room, kitchen, bedrooms, garage. From the main dashboard, a card represents each room at a glance — is the light on? Is anyone in there? Is the TV running? One tap and you’re in that room’s full control panel. Going from a flat entity list to a room hierarchy was the single biggest usability leap I made.
The trick is resisting the urge to put everything on screen. Each room card shows exactly three things: occupancy state, lighting state, and one key device. Everything else lives one tap deeper. In practice, this means a custom:button-card with conditional templates that checks sensor states and renders different icons and colors depending on what’s happening in the room — no manual updates needed.
The hardware: purpose-built panels for every space
One of the best decisions I made was committing to dedicated wall-mounted tablets instead of relying solely on my phone. Each panel runs the WallPanel app, which keeps the screen on, suppresses the Android UI, and loads straight into Home Assistant on boot. No distractions, no notifications bleeding in — just the dashboard.
My main panel lives at the entrance to the home. It’s a 10-inch Samsung tablet, slim profile, flush-mounted — the kind of thing that makes guests do a double take. This is the command center: security status, door locks, who’s home, weather, and quick-access room controls. Because it’s the first thing you see when you walk in or out, it needs to communicate a lot at a glance without requiring interaction. Big tap targets, high contrast, readable from ten feet away.
I have additional tablets in other rooms, each running a view scoped to that space. The room panel doesn’t need to know about the garage door — it needs to know about the lights, the temperature, and whatever device matters most in that room. Keeping each panel’s scope tight is what makes them actually useful rather than just decorative.
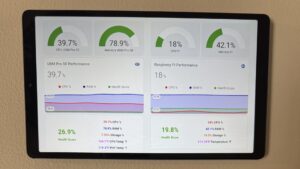
Then there’s my desk setup: an 8-inch Samsung tab running what I call the gauges dashboard. This one is different in character from the rest — it’s less about control and more about monitoring. Circular gauge cards showing real-time power consumption, temperature sensors across the house, network stats, system health. It’s the nerd view. Having a dedicated 8-inch panel for it means I can glance over at any point and get a read on what the house is doing without pulling up an app or navigating anywhere. It just sits there, live, all day.
ESPresense: the house knows where I am
Before I could build a truly context-aware phone dashboard, I needed the house to actually know where I was inside it — not just whether I was home or away, but which room I was in at any given moment. That’s where ESPresense comes in.
ESPresense is a firmware you flash onto ESP32 nodes — small, cheap microcontrollers — and place in each room. Each node listens for Bluetooth Low Energy beacons and triangulates device position based on signal strength. My phone broadcasts a BLE signal constantly, and ESPresense reports in real time which room that signal is strongest in. Home Assistant picks that up as a sensor — something like sensor.randy_iphone_ble — and that single sensor becomes the key that unlocks a whole new class of automation.
I have nodes covering eight rooms. Tuning them took some patience: each node has per-room max distance and absorption values that you dial in through the node’s local web UI. Get those wrong and your phone thinks you’re in the kitchen when you’re in the bedroom. Get them right and the system is eerily accurate — it knows you walked from the living room to the kitchen before you’ve even reached for the light switch.
ESPresense feeds presence state into my room overview cards too. When the sensor reports I’m in a room, that room’s button-card triggers its radar sweep animation — a visual pulse that makes it immediately obvious where activity is detected. It’s a small touch, but it makes the dashboard feel genuinely reactive rather than just decorative.
The dynamic phone dashboard: context that follows you
This is the part I’m most proud of, and the one that gets the most “wait, how does that work?” reactions from anyone who sees it.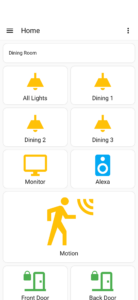
My phone dashboard doesn’t show a fixed layout. It shows the room I’m currently in. Walk into the kitchen — the dashboard surfaces kitchen controls: the lights, the thermostat, the coffee maker switch. Walk into the bedroom — it switches automatically to bedroom controls: lamps, ceiling fan, the LED strip behind the TV. No navigation, no searching, no tapping through views. The right controls are just there, in real time, based on where ESPresense says I am.
 Under the hood, this is driven by a conditional card structure in Home Assistant that evaluates the ESPresense room sensor and renders a different card layout depending on the value. Each room’s layout is pre-built as its own card configuration; the conditional wrapper just decides which one to surface. Because ESPresense updates are near-instant, the transition feels immediate — you walk into a room and the dashboard has already caught up.
At the top of the phone dashboard sits a persistent button: one tap to the main dashboard. No matter which room context is showing, that escape hatch is always there. It’s a small detail, but it matters — the dynamic view handles 90% of what I need day-to-day, but sometimes you want the full picture, and you don’t want to hunt for it. One tap, full overview, done.
Serving the right dashboard to the right device
Tying all of this together is browser_mod, which assigns a persistent browser ID to each panel and device. From there, I can detect which client is making the request and route it appropriately. The entrance tablet gets the main overview. Room tablets get their scoped views. The desk gauges panel always opens directly to the monitoring dashboard. The phone gets the dynamic room-aware layout.
The key configuration detail that tripped me up for a while: WallPanel profiles use the device ID with hyphens converted to underscores, and the global WallPanel defaults need to be explicitly set to false — otherwise settings leak into profiles where you don’t want them. Getting that right is what makes each tablet behave independently.
Going deep on custom cards and animations
Once the layout and hardware were solid, I went deep on custom cards from HACS. Mushroom cards handle clean, minimal controls. Room Card Minimalist powers the room overview panels. But the real rabbit hole is custom:button-card — which is less a card and more a full visual programming environment built on top of YAML and CSS.
Button-card lets you define exactly how a card looks and behaves based on entity state, using Jinja2 templates for dynamic labels and icons, and card_mod for injecting custom CSS animations. My laundry cards wobble when the washer is running and spin when the dryer is active — driven by @keyframes animations triggered conditionally based on entity state. The room overview cards run a radar sweep animation when ESPresense detects my presence. These aren’t just cosmetic: motion catches the eye from across the room in a way that a simple color change doesn’t.
Writing CSS keyframes inside YAML inside a Home Assistant dashboard config is a particular kind of pain. Indentation errors are silent, a missing semicolon breaks the whole card, and the feedback loop is slow. But the result is a dashboard that feels alive rather than static — and once an animation is working, it just works, indefinitely, without any cloud dependency.
The CarPlay surprise: smart home in your car
I saved the best surprise for last — and I mean genuine surprise. I didn’t plan this one at all.
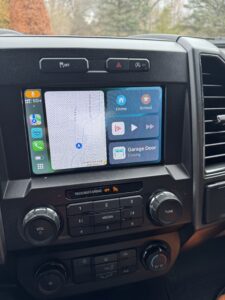
When I added a smart garage door controller and exposed it to HomeKit through Home Assistant’s HomeKit integration, it showed up automatically in Apple CarPlay. I knew I had CarPlay in my car, but I never connected the dots that a garage door in Home Assistant would eventually land on my dashboard screen. Then one day I’m pulling into the neighborhood, I hit my Home zone geofence, and right there on the CarPlay display — my garage door. It had already popped up as a suggested control based on my location.
I took it a step further and built a Home Assistant automation triggered by entering the Home zone: it fires a command to open the garage door automatically. So now the sequence is seamless — I turn onto my street, the zone trigger fires, the garage door starts moving, and by the time I’m pulling in the door is already open. CarPlay just sits there confirming it happened. No tapping, no unlocking the phone, no fumbling for a button.
The HomeKit bridge in Home Assistant is what makes this work. Once an entity is exposed through that integration, Apple’s ecosystem picks it up — and that means Siri, the Home app, CarPlay location suggestions, and automation triggers all become available for free. I’d been using it for lights and locks, but the garage door CarPlay integration was one of those moments where the system did something I hadn’t explicitly asked for, and it was exactly right.
It’s a good reminder that smart home integrations have a way of surprising you. You build one thing, expose it to one ecosystem, and suddenly it shows up somewhere you didn’t expect — working perfectly.
Trial, error, and the long game
I want to be honest about the process: it is slow. Every improvement I’ve described came after at least one version that didn’t work. ESPresense tuning took multiple rounds of adjusting absorption values room by room. The WallPanel profile issue required me to rethink how I structured device-specific config. The dynamic phone dashboard went through three different conditional card approaches before one felt right. The button-card animations required learning CSS keyframes well enough to write them blind in YAML.
But Home Assistant rewards persistence. Because everything is local and self-hosted, there’s no company that can deprecate your setup or change a pricing tier. When I finally got a room card animating exactly right, or watched my phone dashboard flip to kitchen controls the moment I walked in to make coffee, or saw my garage door open itself as I turned onto my street — it stayed that way.
If you’re just getting started, my advice is this: don’t try to build the perfect dashboard on day one. Start with one view that solves one real problem. Get that working well, live with it for a week, and let the next improvement reveal itself. The dashboard you end up with won’t look like anyone else’s setup — and that’s exactly the point.